Quick Take
The auxiliary battery is not automatically the problem every time a JL Wrangler or JT Gladiator shows an electrical warning. A weak main battery, loose terminal, bad ground, aging auxiliary battery, charging issue, or stored Stop/Start fault can all create similar symptoms. The smartest repair starts with testing both batteries separately instead of guessing.
If both batteries are the same age and one has clearly failed, replacing both is often the cleanest long-term fix. A weak auxiliary battery can drag down a good main battery, and a weak main battery can make the auxiliary battery look guilty even when it is not the only issue.
What the Auxiliary Battery Does
On many 2018 and newer Wrangler JL models and 2020 and newer Gladiator JT models, the Stop/Start system uses a smaller auxiliary battery along with the main battery. The exact setup can vary by model year, engine, market, and equipment, so always verify the system on the Jeep you are working on.
The auxiliary battery helps support electronics during Engine Stop/Start events. When the Jeep shuts the engine off at a stop, the system still needs stable voltage for modules, lights, accessories, and restart logic. When either battery is weak, the Jeep may disable Stop/Start or act like it has several unrelated electrical problems.
Common Symptoms
- Stop/Start unavailable message on the dash.
- Battery protection mode, charging system messages, or low-voltage warnings.
- Slow crank, clicking, or intermittent no-start complaints.
- Main battery going dead after sitting.
- Warning lights that appear together after a low-voltage event.
- Radio, screen, lock, or accessory behavior that seems random.
- Problems returning soon after only the main battery was replaced.
Test Before Replacing Parts
Battery problems are easy to misdiagnose because voltage-sensitive modules can throw odd warnings. Start with basic checks: battery age, resting voltage, terminal condition, grounds, fuses, and whether the Jeep has been sitting long enough to drain a marginal battery.
A load test is more useful than a quick voltage glance. Test the main battery and auxiliary battery separately if possible. Also check charging voltage with the Jeep running, inspect the intelligent battery sensor area, and scan for stored codes if the dash has repeated Stop/Start or charging warnings.
Owner tip: If the Jeep has a low-voltage event, several warnings may appear at once. Fix the battery or connection problem first, then see what returns after a normal drive cycle before chasing every warning as a separate failure.
Replacement Choices
| Choice | When It Makes Sense | Watch For |
|---|---|---|
| Test and charge first | Best first move when symptoms are new, the Jeep has been sitting, or the batteries are not very old. | A battery can show decent voltage and still fail a load test. |
| Replace auxiliary battery only | Reasonable if the main battery tests strong and the auxiliary battery clearly fails testing. | An older main battery may fail soon after and make the repair feel incomplete. |
| Replace both batteries | Often the best long-term choice when both batteries are original, old, or one battery has been draining the other. | Costs more up front but avoids repeat diagnosis and another battery job soon after. |
| Bypass or delete the auxiliary battery | Some owners do this, especially on modified Jeeps, but it is not the cleanest recommendation for most daily drivers. | Can affect Stop/Start behavior, diagnostics, warranty conversations, and inspection expectations depending on location and vehicle condition. |
Battery Type Matters
Use the correct battery type and size for the Jeep. Many JL and JT applications call for AGM batteries because of the electrical load and Stop/Start cycling. A cheaper flooded battery may fit physically, but it may not hold up properly in a system designed around AGM performance.
Match terminal layout, capacity, and fitment. If the Jeep has aftermarket winches, lighting, radios, fridges, or other accessories, those loads should be considered too. Accessories can expose a weak charging or battery setup faster than a stock Jeep.
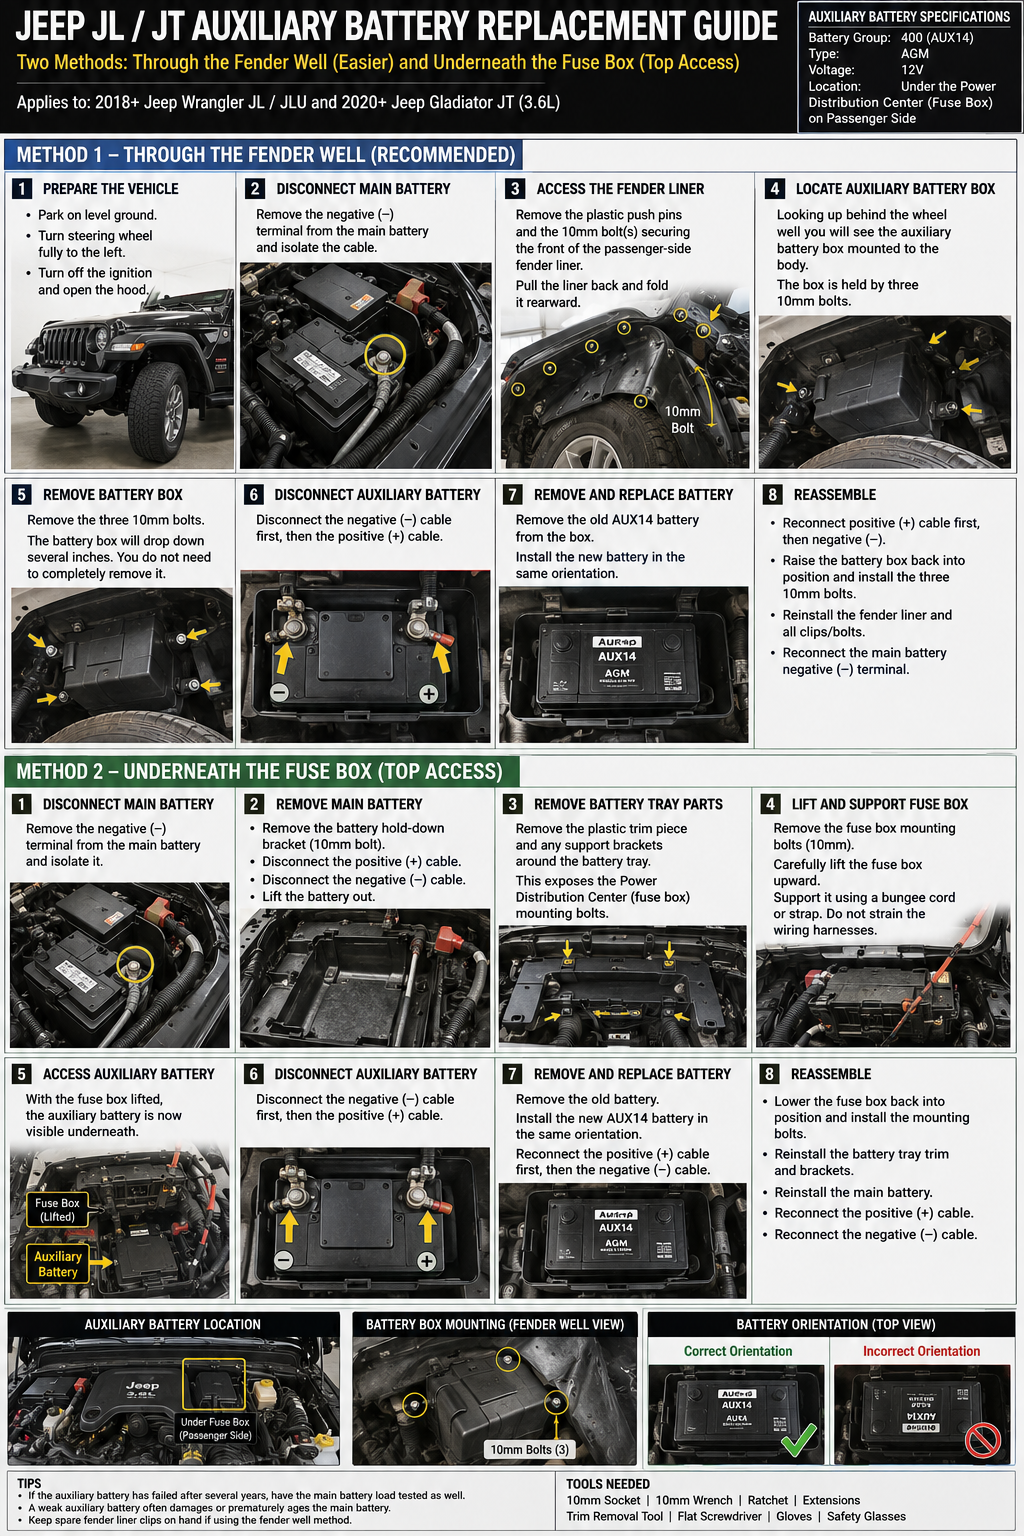
Replacement Method 1: Fender-Well Access
The auxiliary battery is commonly accessed through the passenger-side front fender-well area on JL and JT models. This method usually involves safely supporting the Jeep, removing or moving the wheel liner, and working through the opening to reach the battery tray.
- Park safely, set the brake, and disconnect the negative cable before working around battery cables.
- Remove the passenger front wheel if needed for working room.
- Remove the fender liner fasteners carefully so the liner can move without breaking clips.
- Access the auxiliary battery hold-down and cables.
- Remove the old battery, install the new battery, and make sure the terminals are clean and tight.
- Reinstall the liner and wheel, then test the Jeep through a normal start and drive cycle.
This method keeps you away from some of the under-hood power distribution parts, but it can be awkward if clips are brittle, tires are oversized, or the Jeep has aftermarket liners.
Replacement Method 2: Top Access
Some owners and technicians prefer top access from the engine bay. This approach usually involves working around the fuse box or power distribution center to reach the battery from above. It can be cleaner on some Jeeps, but there is less room for error around electrical components.
- Disconnect the negative battery cable and protect loose cables from accidental contact.
- Remove the components needed to create access above the auxiliary battery area.
- Keep track of every connector, fastener, and bracket so the power distribution area goes back exactly as it came apart.
- Remove the old auxiliary battery and inspect the tray, cables, and terminals.
- Install the replacement battery and confirm the terminals are secure.
- Reassemble carefully and check for warning lights, loose connections, and proper charging voltage.
Safety caution: Do not rush around the fuse box or power distribution center. A shorted cable or misplaced connector can turn a battery job into a much bigger electrical repair.
Common Mistakes
- Replacing the main battery but ignoring a weak auxiliary battery.
- Replacing the auxiliary battery without testing the main battery.
- Leaving terminals slightly loose after the repair.
- Breaking fender liner clips and leaving the liner poorly secured.
- Using the wrong battery type or an undersized replacement.
- Assuming every Stop/Start unavailable message means the battery is bad.
- Skipping a charging system check after repeated battery failures.
After Replacement
After installing the battery or batteries, verify that the Jeep starts normally, charging voltage looks reasonable, terminals are tight, and the Stop/Start message does not immediately return. Some messages may clear after a normal drive cycle once the system sees stable voltage again. If warnings return quickly, scan for codes instead of continuing to replace parts.
If the Jeep sits for long periods, a maintenance charger can help. Short trips, cold weather, and accessory loads are hard on batteries, especially in a dual-battery Stop/Start setup.
Bottom Line
The auxiliary battery is a common pain point, but the best fix is not always simply throwing a small battery at the Jeep. Test both batteries, inspect connections and grounds, use the correct AGM replacements, and choose the access method that fits the Jeep and your comfort level. When both batteries are old, replacing them together is often the simplest way to stop repeat low-voltage problems.